This story puts a specific focus on creating a docker image for one of my independent deep learning project using detectron2 (Facebook AI) as the backbone. I might write about that project too!
There were many medium articles and docs but everywhere either they have gone into too much details or are simply incomplete. Thus I decided to write an article so that you guys don’t have to surf the internet for a day.
Dockerizing your Flask application, before uploading on a platform such as heroku has many upsides to it. You are not limited to the features offered by Heroku and can move your application to any cloud provider. All you have to do is just deploy the Docker image onto your new provider.
If you don’t know much about Docker then it’s fine too! I have covered all necessary information here.
Contents:
- Why Docker??
- Docker Installation
- Creating and docker image
- Deploying image on Heroku
- Releasing the image for production
Why Docker??
Alright we get it, ‘Cloud’ is the future. Platform as a Service (PaaS) is cool! What possibilities it explores are much cooler. Containerizing an application is a great way to deploy a machine learning model into production.
Docker uses OS-level virtualization to deliver software packages called containers. For developers and those experimenting with Docker, Docker Hub is your starting point into Docker containers.
Difference between Docker image and container
Docker image is a software package you build on your dev project. A docker container run on the image. There could be multiple containers on an image. This difference is very subtle and many new developers often use wrong terminologies. Read it again if you didn’t understood.
Introduction to Dockerfile
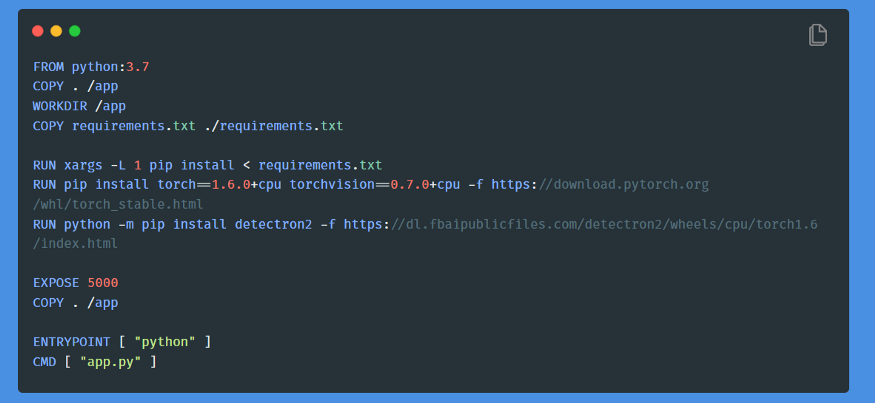
Dockerfile is a text file (without any extension) which tells docker daemon how to build a custom docker image.
 For example, the first line tells the docker to build an image on top of official image for python3.7. You can always build your docker image on top of any other image. There are endless possibilities.
RUN simply run a command in your docker container whenever it is initialized.
EXPOSE tells the daemon to clear out 5000 port for external mapping. Thus if you want to run your application on port 5000, this is it.
ENTRYPOINT and CMD simply runs your command, in this case, python app.py
Docker Installation
This might be too easy and a bit difficult. Same story for every new software you’re gonna use. There are always two ways for understanding the syntax of following through a new application and using it further in your application, either lookup in the docs, or come here! 😄
I am going to install on Windows 10 platform.
You will need Windows 10 1903 (May 2019) or enterprise.
- Register an account on docker if you haven’t already.
- Run the application Docker Hub on your system.
Creating docker image
Make sure you have these in your projects root directory:
- Dockerfile
- requirements.txt
- app.py
Also, in app.py you must set the module’s (in this case app.py) ‘__name__’ equal to ‘__main__’ and host is mentioned.
Without mentioning the host you won’t be able to connect to the web app externally (from externally, I meant, external to image)
Now, make sure you are in root directory of the project and run the following command:
sudo docker build --tag flask-demo-app .The following command will start building your image with name as flask-demo-app. Now you can run the following docker image:
docker run -d -p 5000:5000 flask-demo-appThis will map 5000 port of your machine to the 5000 port of your container. Run localhost:5000/ on your browser and your app should be up and running.
You can use docker ps command to view each running image. Use the container ID to stop the container.
Deploying image on heroku
- Install heroku-cli using apt-install (if on Linux) or using binary file through https://devcenter.heroku.com/articles/heroku-cli
- Verify your installation using
heroku --versioncommand. - After installing, run
heroku logincommand for logging into your account. - Then run
heroku container:loginto register your container.
Now create heroku app using heroku create demo-app .
- Now upload your container to the heroku demo-app by running
heroku container:push web --app demo-app. - Release your image to the app:
heroku container:release web --app demo-app.
Hopefully, your app should be running! Pat yourself on the back because you just deployed your demo app into production.
PS: There are many things which I could cover like Heroku dynos which are an abstractions to simplify development and enhance productivity by freeing you from management infrastructure. You can read more about it on https://www.heroku.com/dynos.
There are many great heroku-cli options to see your logs or repository too.
I hope you got what you were looking for :) Leave comments for any query or constructive suggestions.